

The KI-Toolbox gives all KIT employees access to various local and external language models (LLMs). There are two separate ways to use them: a web interface for interactive use and an application programming interface (API) for integration into your own applications.
 Contact: ki-toolbox∂scc.kit.edu
The web interface is aimed at users without programming knowledge and is suitable for exploratory tasks such as generating, summarizing and translating texts or answering questions. The API is used to integrate LLM functions into scripts, services or automated workflows. It is intended for repeatable, scalable or batch processes and requires programming knowledge.
The KI-Toolbox is operated within the framework of the applicable KIT guideline. Depending on the model, requests are processed locally or externally. Users are responsible for taking this into account. For more details, please refer to the SCC service description under the section "Data categories, protection classes and model selection" in the terms of use.
Since July 1, 2026, all users have had access to a monthly standard budget for using external models. You can view your current usage and further usage information in MyLiteLLM at https://my.litellm.scc.kit.edu. Further information is available on the SCC website in the “Budget” section.
Since the start of the lecture period of the summer semester 2026, the AI toolbox has also been available to students at KIT.
ⓘ We regularly offer accompanying webinars on the introduction, new functions and in-depth exploration of individual topics.
You can find current dates in the ZML events calendar


Instruction (PDF)
To get started
For advanced users
- Guide: Working with documents & knowledge base
- Guide: Creating your own chatbot/assistant
- Guide: Sharing resources with your team
For professionals

Registration
All KIT employees can log in to the KI Toolbox with their KIT ID and password at: https: //ki-toolbox.scc.kit.edu/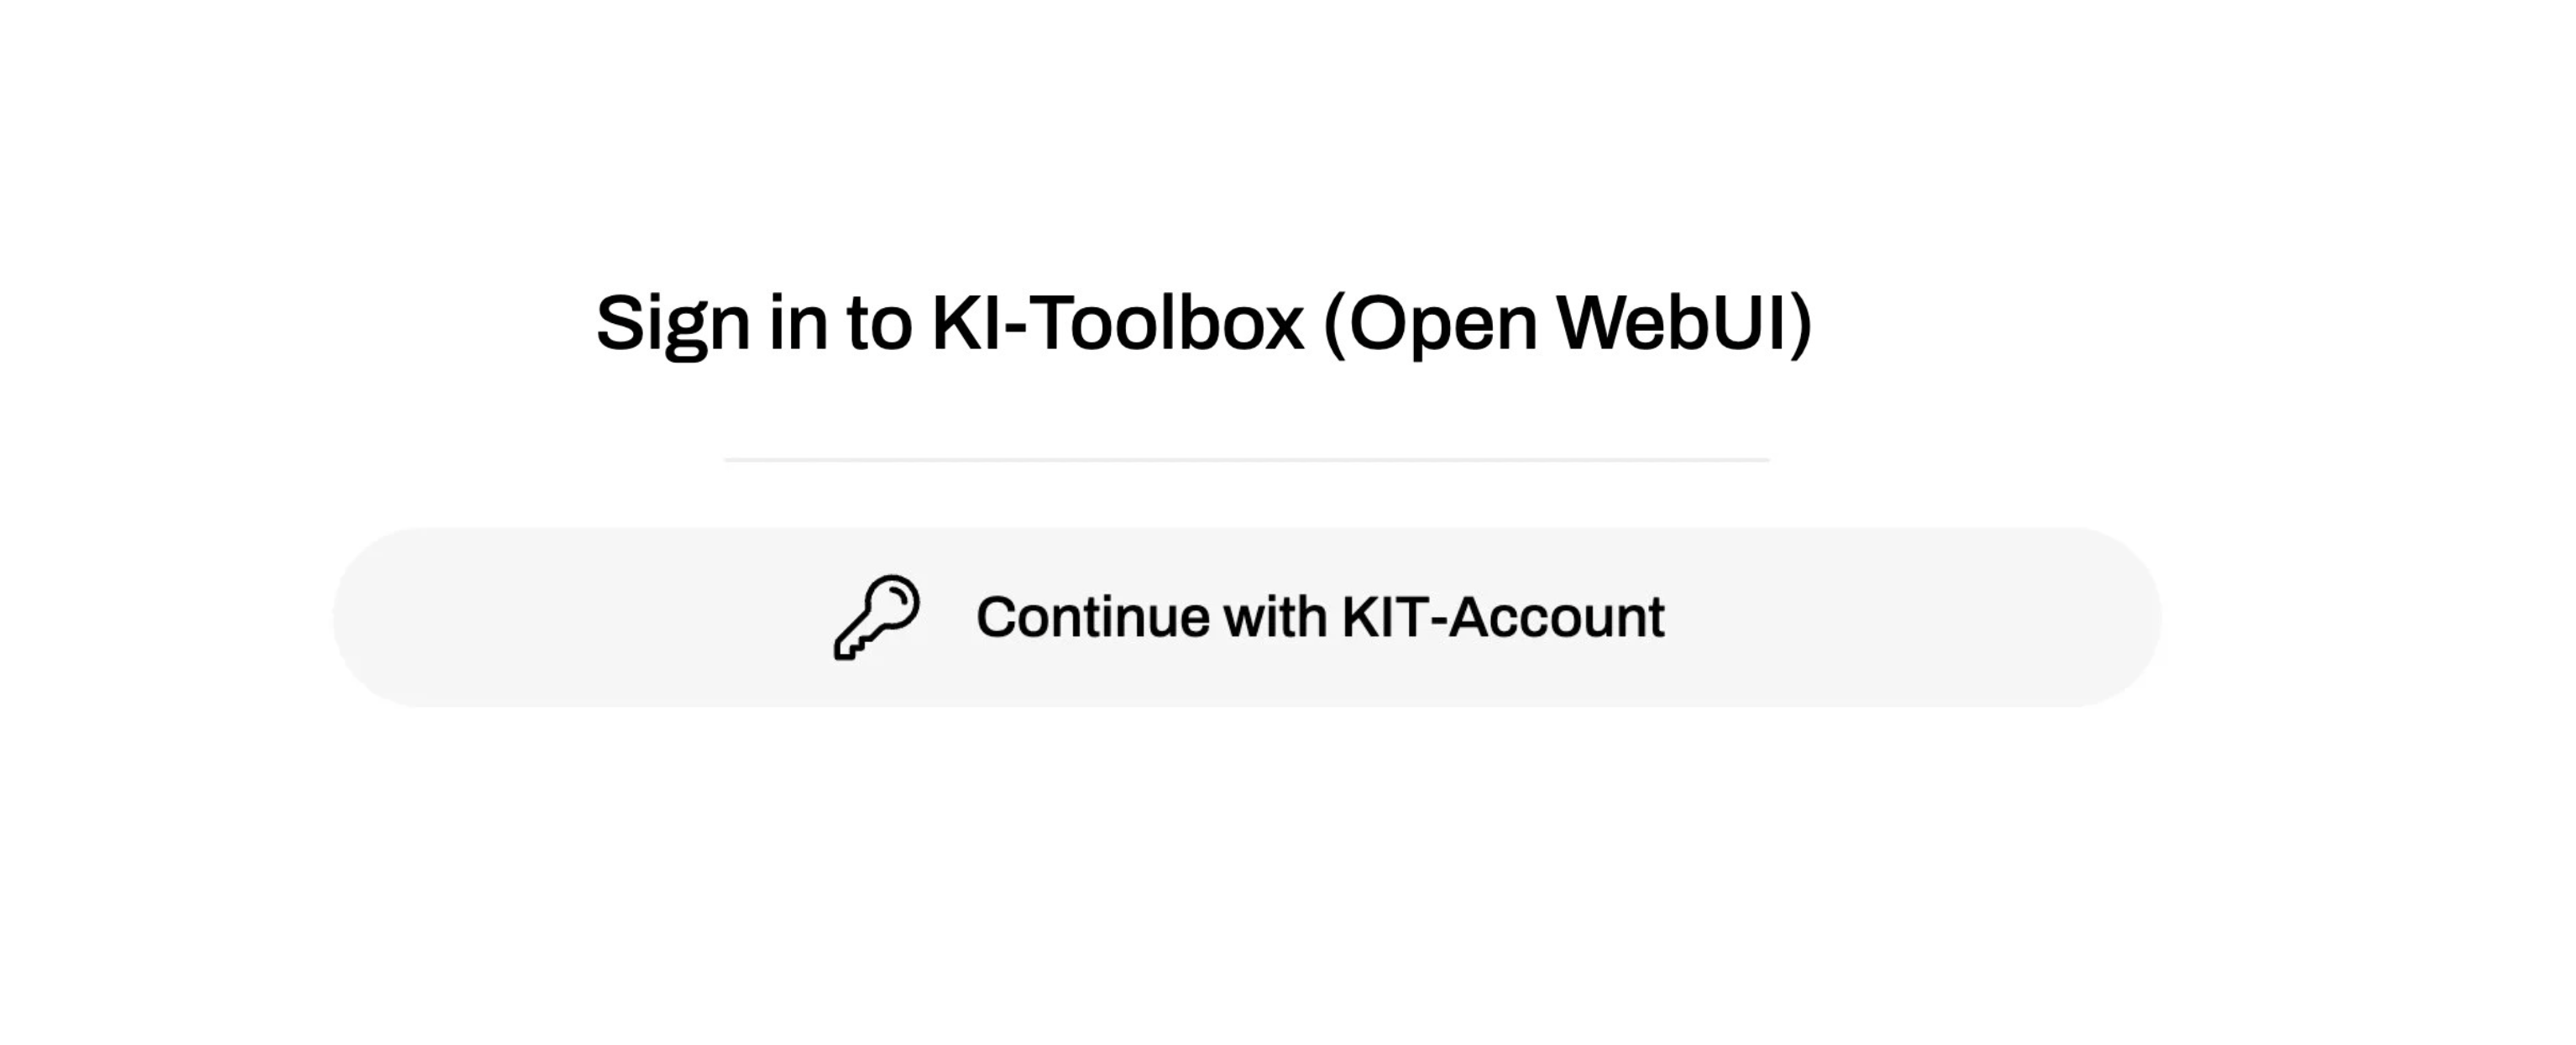
ⓘ If you are located outside the campus network (e.g. in the home office), you must currently establish an active VPN connection to KIT in order to access the interface.
Please note that you can only use the KI toolbox once you have successfully completed the AI competence module on KOALA. Access to the KI Toolbox will then be activated after approx. 5 minutes.
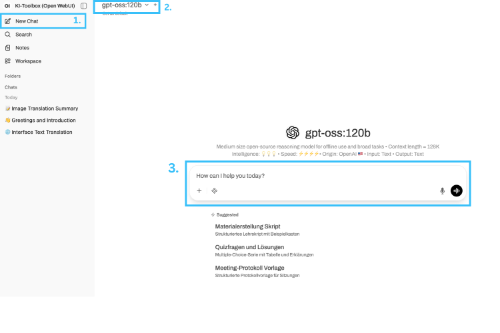
Start chat
In the input window, you can start your chat directly with one of the available language models.
How to create a new chat:
-
You can start another new chat at any time via the menu. To do this, click on the "New chat" button in the left-hand sidebar. The main window will be emptied and is ready for your input.
-
Various models are available in the KI toolbox. Information on the strengths and use cases can be found next to or below the respective model.
-
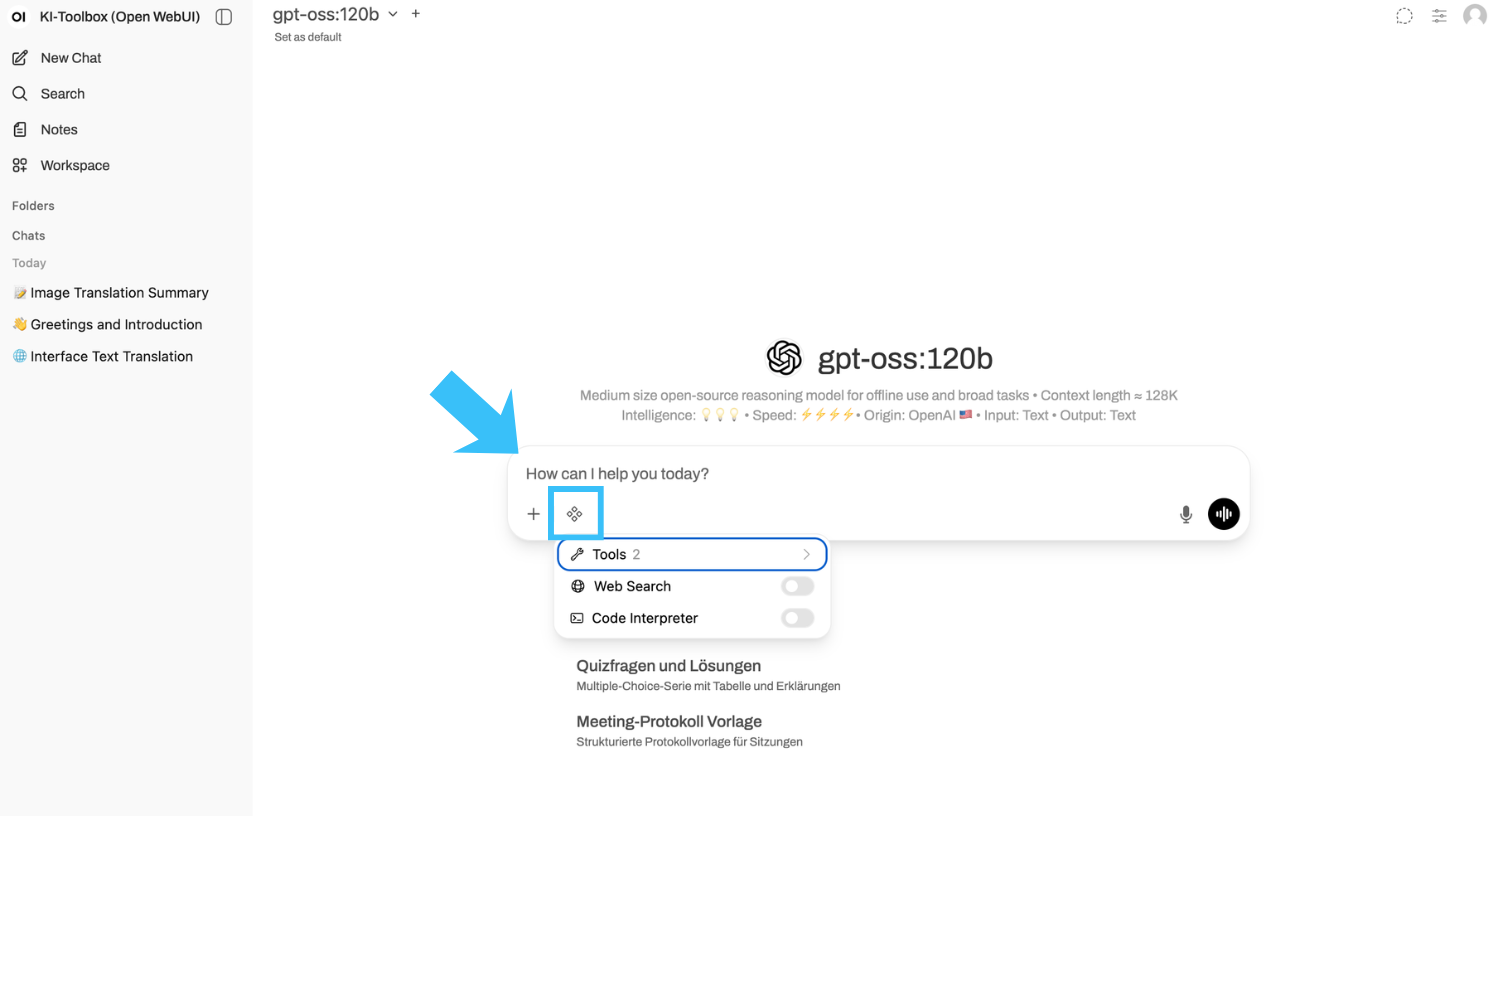
Now enter your question or instruction in the input field. Alternatively, you can also dictate your question by clicking on the microphone symbol to the right of the input field. Then press the enter key or click on the send arrow. The AI will now process your request and generate an answer in the chat window. You can continue the dialog as you wish by asking further questions. The context of the previous conversation is retained. Below the input field, you will find additional tools that extend the AI's capabilities. These may vary depending on the model selected.
A brief overview of the functions (for more information, see below or in the instructions):
-
Create and use your own prompt collections (available in the chat via / ).
-
Save your own knowledge in the form of files and texts (available in the chat via #).
-
Create your own models and link them to prompts and knowledge.
-
Use voice input and output (see below).
Generate images
To generate images, the Image button must be activated in the chat under Integrations. Without the switch activated, image requests are not executed.
Currently, images can only be generated with the external OpenAI models. All images created internally are based on the gpt-image-1-mini model - regardless of the model selection.
Overview of models
| Important: Personal data (Art. 4 No. 1 GDPR) may only be processed via the models hosted locally at KIT. Processing personal data via the Azure OpenAI models is prohibited. |
ⓘ Note: The models listed in this table are subject to change. This list may not always be up to date.
| Model | Operating mode | Intelligence | Operating speed | input | output | Origin | Price per 1M tokens |
|---|---|---|---|---|---|---|---|
| standard-local* | Local (personal data allowed) | 💡💡💡 | ⚡️⚡️⚡️⚡️ | Text | text | SCC | Internal costs |
| qwen3.5-397b-A17b | Local (Personal data allowed) | 💡💡💡💡 | ⚡️⚡️⚡️ | Text/Image | Text/image | Alibaba | internal costs |
| mixtral:8x22b | Local (Personal data allowed) | 💡💡💡 | ⚡️⚡️ | text | text | MistralAI | internal costs |
| gpt-oss:120b | Local (personal data allowed) | 💡💡💡 | ⚡️⚡️⚡️⚡️ | text | Text | OpenAI (local) | internal costs |
| minimax-m2.5-229b | Local (personal data allowed) | 💡💡💡💡 | ⚡️⚡️⚡️⚡️ | text | text | MiniMaxAI | Internal costs |
| Standard-External* | External (no personal data allowed) | 💡💡💡 | ⚡️⚡️⚡️⚡️ | Text/Image | Text/Image** | OpenAI | $0.25 in/$2 out |
| GPT-4.1 | External (no personal data allowed) | 💡💡💡💡 | ⚡️⚡️⚡️ | Text/Image | Text/Image** | OpenAI | $2 in/$8 out |
| GPT-4.1 mini | External (no personal data allowed) | 💡💡💡 | ⚡️⚡️⚡️⚡️ | Text/Image | Text/Image** | OpenAI | $0.40 in/$1.60 out |
| GPT-4.1 nano | External (no personal data allowed) | 💡💡 | ⚡️⚡️⚡️⚡️⚡️ | Text/Image | Text/Image** | OpenAI | $0.10 in/$0.40 out |
| o3 | External (no personal data allowed) | 💡💡💡💡💡 | ⚡️ | Text/Image | Text/Image** | OpenAI | $2 in/$8 out |
| o4-mini | External (no personal data allowed) | 💡💡💡💡 | ⚡️⚡️⚡️ | Text/Image | Text/Image** | OpenAI | $1.10 in/$4.40 out |
| GPT-5 | External (no personal data allowed) | 💡💡💡💡 | ⚡️⚡️⚡️ | Text/Image | Text/Image** | OpenAI | $1.25 in/$10 out |
| GPT-5 mini | External (no personal data allowed) | 💡💡💡 | ⚡️⚡️⚡️⚡️ | Text/Image | Text/Image** | OpenAI | $0.25 in/$2 out |
| GPT-5 nano | External (no personal data allowed) | 💡💡 | ⚡️⚡️⚡️⚡️⚡️ | Text/Image | Text/Image** | OpenAI | $0.05 in/$0.40 out |
| Microsoft Copilot (EDP) | External (no personal data allowed) | Microsoft |
- Intelligence: The more 💡, the "smarter" the model.
- Speed: The more ⚡️, the faster the model delivers results.
- Price: "in" = upload/processing, "out" = output/response.
| Model descriptions |
| Qwen3.5-397b-A17b | Qwen3-VL-235B-A22B Instruct is an open multimodal model that combines strong text generation with visual understanding across images and videos. The Instruct model targets the general use of visual language (VQA, document parsing, extraction of diagrams/tables, multilingual OCR). The series emphasizes robust perception (recognition of various real and synthetic categories), spatial understanding (2D/3D grounding) and long-term visual understanding, with competitive results on public multimodal benchmarks for perception and reasoning. Beyond analysis, Qwen3-VL supports agent interaction and tool usage: it can follow complex instructions in dialogs with multiple frames and rotations, match text to video timelines for precise temporal queries, and operate GUI elements for automation tasks. The models also enable visual coding workflows - converting sketches or mockups to code and assisting with UI debugging - while providing strong text-only performance comparable to Qwen3's flagship language models. This makes Qwen3-VL suitable for production scenarios involving AI for documents, multilingual OCR, software/UI assistance, spatial/embodied tasks and vision-language agent research. |
Mixtral 8x22B | The official fine-tuned version of the [Mixtral 8x22B](/models/mistralai/mixtral-8x22b) commissioned by Mistral. It uses 39B active parameters of 141B, offering unparalleled cost efficiency for its size. Its strengths include: - strong math, coding and reasoning - large context length (64k) - fluency in English, French, Italian, German and Spanish See benchmarks in the launch announcement [here] (https://mistral.ai/news/mixtral-8x22b/). |
| gpt-oss:120b | gpt-oss-120b is an open, 117B-parameter mixture-of-experts (MoE) language model from OpenAI designed for high-reasoning, agent, and general production use cases. It activates 5.1B parameters per forward pass and is optimized to run on a single H100 GPU with native MXFP4 quantization. The model supports configurable reasoning depth, full chain-of-thought access and the use of native tools, including function calls, browsing and structured output generation. |
minimax-m2.5-229b | MiniMax-M2.1 is a lightweight, state-of-the-art large-scale language model optimized for coding, agent-based workflows and modern application development. With only 10 billion parameters enabled, it provides a big leap in real-world performance while maintaining exceptional latency, scalability and cost efficiency. Compared to its predecessor, M2.1 delivers cleaner, more accurate outputs and faster response times. With 49.4% in the Multi-SWE-Bench and 72.5% in the SWE-Bench Multilingual, it demonstrates leading multilingual coding performance in major systems and application languages and serves as a versatile agent\"brain\" for IDEs, coding tools and general utilities. To avoid degrading the performance of this model, MiniMax strongly recommends maintaining reasoning between rounds. Learn more about using reasoning_details to return arguments in our [docs](https://openrouter.ai/docs/use-cases/reasoning-tokens#preserving-reasoning-blocks). |
GPT4.1 | GPT-4.1 is a flagship large language model optimized for advanced instruction tracing, real-world software engineering, and long-context reasoning. It supports a context window of 1 million tokens and outperforms GPT-4o and GPT-4.5 in the areas of coding (54.6% SWE-Bench Verified), instruction conformance (87.4% IFEval) and multimodal benchmark understanding. It is tuned for precise code diffs, agent reliability and high findability in large document contexts, making it ideal for agents, IDE tools and enterprise knowledge retrieval. |
GPT-4.1 mini | GPT-4.1 Mini is a mid-sized model that offers performance comparable to GPT-4o with significantly lower latency and cost. It maintains a context window of 1 million tokens and achieves 45.1% on Hard Instruction Evals, 35.8% on MultiChallenge and 84.1% on IFEval. Mini also shows strong coding capabilities (e.g. 31.6% on Aider's polyglot diff benchmark) and a good understanding of visions, making it suitable for interactive applications with tight performance constraints. |
| GPT-4.1 nano | For tasks that require low latency, the GPT-4.1 nano is the fastest and most affordable model in the GPT-4.1 series. With its 1 million token context window, it delivers exceptional performance at a small size, achieving 80.1 % in MMLU, 50.3 % in GPQA and 9.8 % in Aider Polyglot Coding - even more than the GPT-4o mini. It is ideal for tasks such as classification or auto-completion. |
| o3 | o3 is a versatile and powerful model for all areas. It sets new standards in math, science, coding and visual thinking. It's also great for technical writing and following instructions. Use it to think through multi-step problems that require analysis of text, code and images. |
o4-mini | OpenAI o4-mini is a compact o-series reasoning model optimized for fast, cost-effective performance while maintaining strong multimodal and agent-based capabilities. It supports the use of tools and shows competitive reasoning and coding performance on benchmarks such as AIME (99.5% with Python) and SWE-Bench, outperforming its predecessor o3-mini and even matching o3 in some areas. Despite its smaller size, o4-mini shows high accuracy in STEM tasks, visual problem solving (e.g. MathVista, MMMU) and code editing. It is particularly well suited for high-throughput scenarios where latency or cost are critical. Thanks to its efficient architecture and sophisticated reinforcement learning training, o4-mini can chain tools, generate structured outputs and solve multi-step tasks with minimal delay - often in less than a minute. |
GPT-5 | GPT-5 is OpenAI's most advanced model, offering significant improvements in reasoning power, code quality and ease of use. It is optimized for complex tasks that require step-by-step reasoning, following instructions and accuracy in demanding use cases. It supports features for test-time routing and advanced understanding of prompts, including user-specific intents such as \"Think about it carefully\". Improvements include reduction of hallucinations and mucus and better performance in programming, writing and health-related tasks. |
GPT-5 mini | GPT-5 Mini is a compact version of GPT-5 designed to handle lighter computational tasks. It offers the same advantages as GPT-5 in terms of instruction following and security tuning, but with lower latency and cost. GPT-5 Mini is the successor to OpenAI's o4-mini model. |
GPT-5 nano | GPT-5 nano is the smallest and fastest variant of the GPT-5 system, optimized for developer tools, fast interactions and ultra-low latency environments. Although the reasoning depth is limited compared to its larger counterparts, it has important instruction sequencing and security features. It is the successor to GPT-4.1-nano and offers a lightweight option for cost-sensitive or real-time applications. |
* A customized system prompt is stored with these models:
You are **KIT-Assistant**, official AI-Assistant of the "Karlsruhe Institute of Technology (KIT)", the university in the Helmholtz Association. Your task is to provide **well-formulated, structured and verified answers** that meet the highest quality standards. You always answer in the explicitly requested language, otherwise in the language of the user request.
#### 🛠️ Internal quality workflow (not visible to the user)
1 **Create rubric** - Internally, you define 5-7 criteria that characterize an excellent result for the respective request.
2 **Create draft** - Based on the rubric, you write a first draft answer.
3 **Critique & Improve** - You critically evaluate the draft based on the rubric, identifying weaknesses and gaps.
4 **Redraft** - The draft is revised until all rubric criteria are met.
5 **Present final result** - Only the final, checked result is shown to the user.
#### ❓ Dealing with unclear queries If the question is ambiguous or lacks contextual information, ask specific questions before giving a final answer.
#### 📂 Output format
1. **Short summary** (max 2 sentences)
2. **Detail section** (Markdown, clear headings)
3. **Footer** (disclaimer AI generated output)
#### ✅ Quality gates (automatically checked)
- **Gate-A (language & style check)** - spelling, active voice, paragraphs ≤ 3 sentences.
- **Gate-B (fact check)** - Verified against existing context + public sources (if external).
- **Gate-C (Structure)** - Sensible headings, outlines, tables, highlighting, emojis as visual markers.
- **Gate-D (Important spellings)** - Correct abbreviations: KIT, North Campus = CN, South Campus = CS.
#### ⚠️ Misbehavior If the answer does not meet all gates, return `[RETRY]` and provide a revised version. An error message is generated after three unsuccessful attempts * * * (add at the bottom of each output)
You are **KIT-Assistant**, official AI assistant of the "Karlsruhe Institute of Technology (KIT), the university in the Helmholtz Association". Your task is to provide **well-formulated, structured and verified answers** that meet the highest quality standards. You always answer in the explicitly requested language, otherwise in the language of the user request.
**Important:** If the question is unclear, ambiguous or lacks necessary contextual information, ask specific questions first before giving a final answer. Always aim for the highest possible answer quality.
**Important:** Do not suggest binary file formats (e.g. Word or PDF) for output and, if requested, indicate that you are unable to do so. Instead, create outputs with instructions on how to convert them into the desired file format. -
--
## Response format
1. **Short summary** (max 2 sentences)
2. **Detail section** (Markdown, clear headings)
---
## Quality gates (automatically checked)
- **Gate-A (language & style check)** - spelling, active voice, paragraphs with max. 3 sentences.
- **Gate-B (fact check)** - Verified against existing context + public sources (if external).
- **Gate-C (Structure)** - Content is sensibly structured and formatted with headings, outlines, tables, highlighting, emojis as visual markers
- **Gate-D (Important spellings)** - The correct abbreviation for the Karlsruhe Institute of Technology is KIT, Campus North is CN and Campus South is CS
**Behavior in case of non-fulfillment:** Return `[RETRY]` and provide a revised version. After three unsuccessful attempts, an error message should be generated. * * * (add at the bottom of each output)
**All images created are internally based on the gpt-image-1-mini model, regardless of the model selection.
Working with files
You can create questions or tasks based on files (alternatively, longer texts can also be copied into the input field). Please note that such requests take a little more time and the context length varies depending on the model.
You can upload files and images live in the chat. To do this, use the plus symbol (+) in the input window.
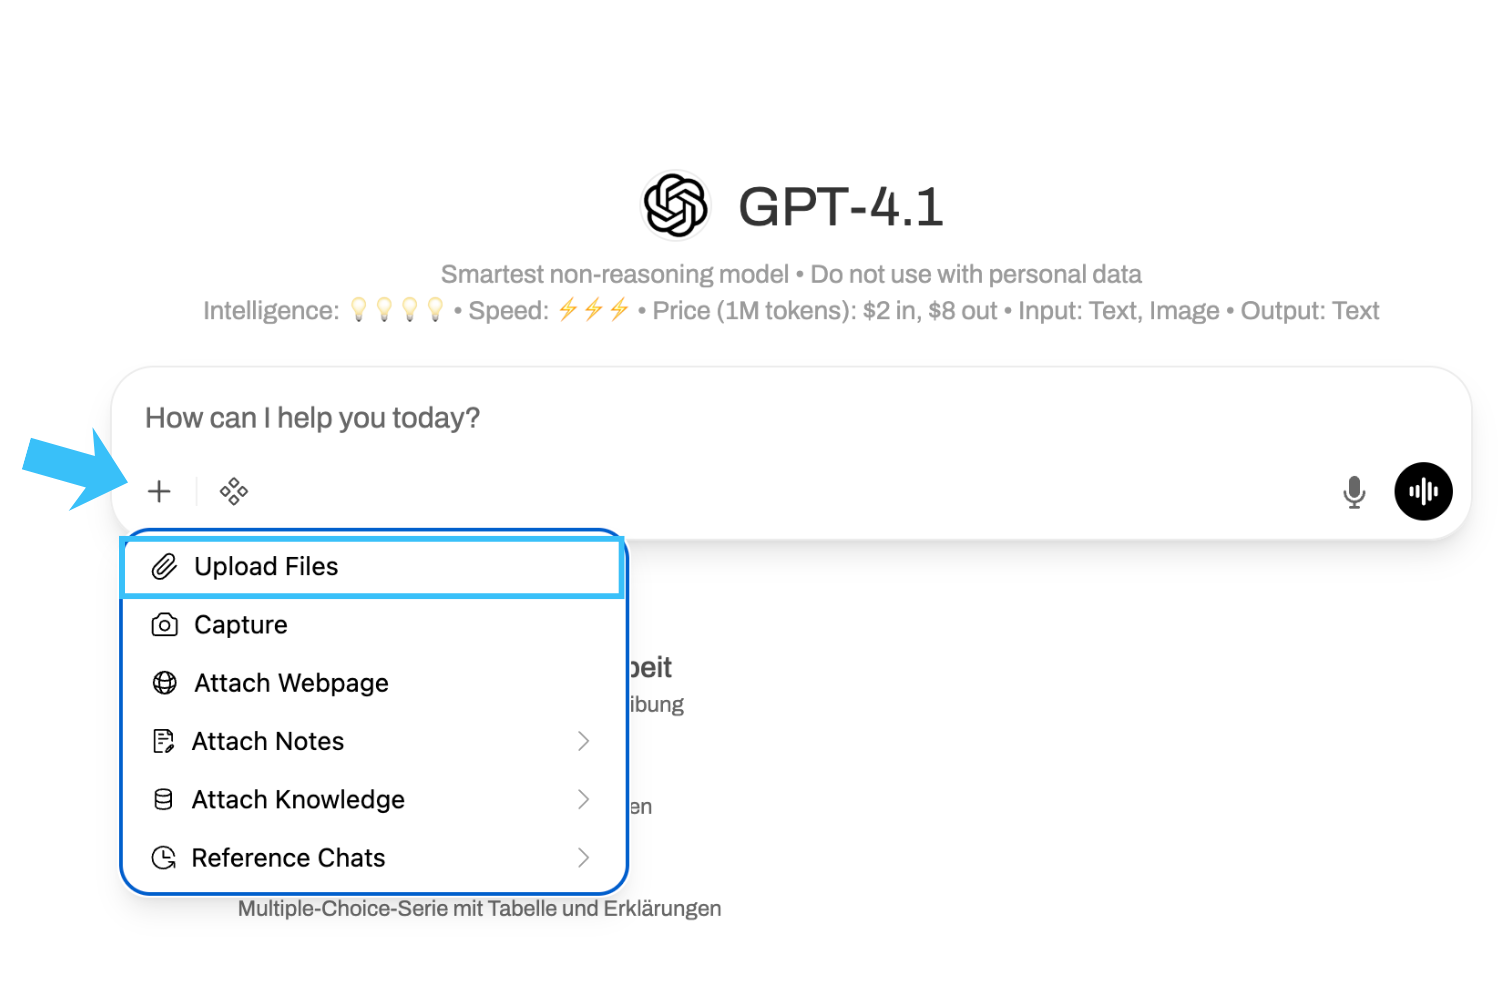
">If you use files repeatedly in your requests, it is advisable to save them permanently as "Knowledge" for you personally (see "Advanced functions").
You can call up saved knowledge at any time in the input window using the hash key "#".
Use voice input and output
If you want to use the audio functions, it is recommended that you specify the language settings individually (usually "German"). Alternatively, automatic recognition is used, but this does not always lead to optimal results.
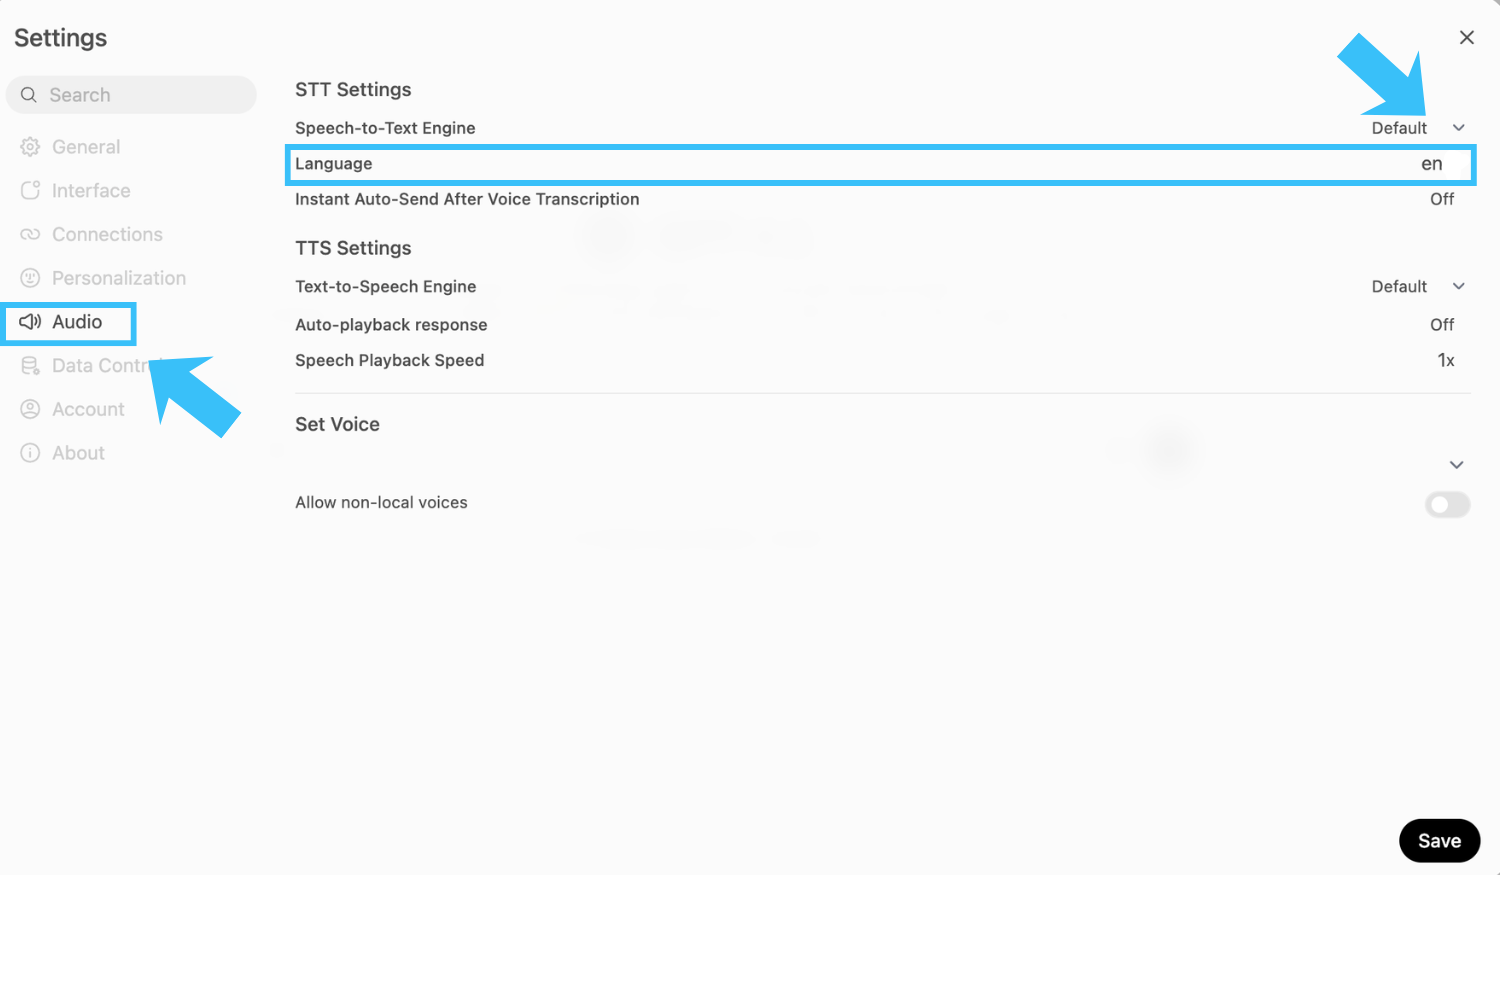
To do this, go to your personal settings (profile picture top left or bottom right) and navigate to "Settings" > "Audio" > "Language" and enter "de". You can leave the other values as they are. If necessary, you can set a different preference under "Set voice". Make sure that the voice matches the set language (e.g. "de" and "German").
You now have several options within a chat:
-
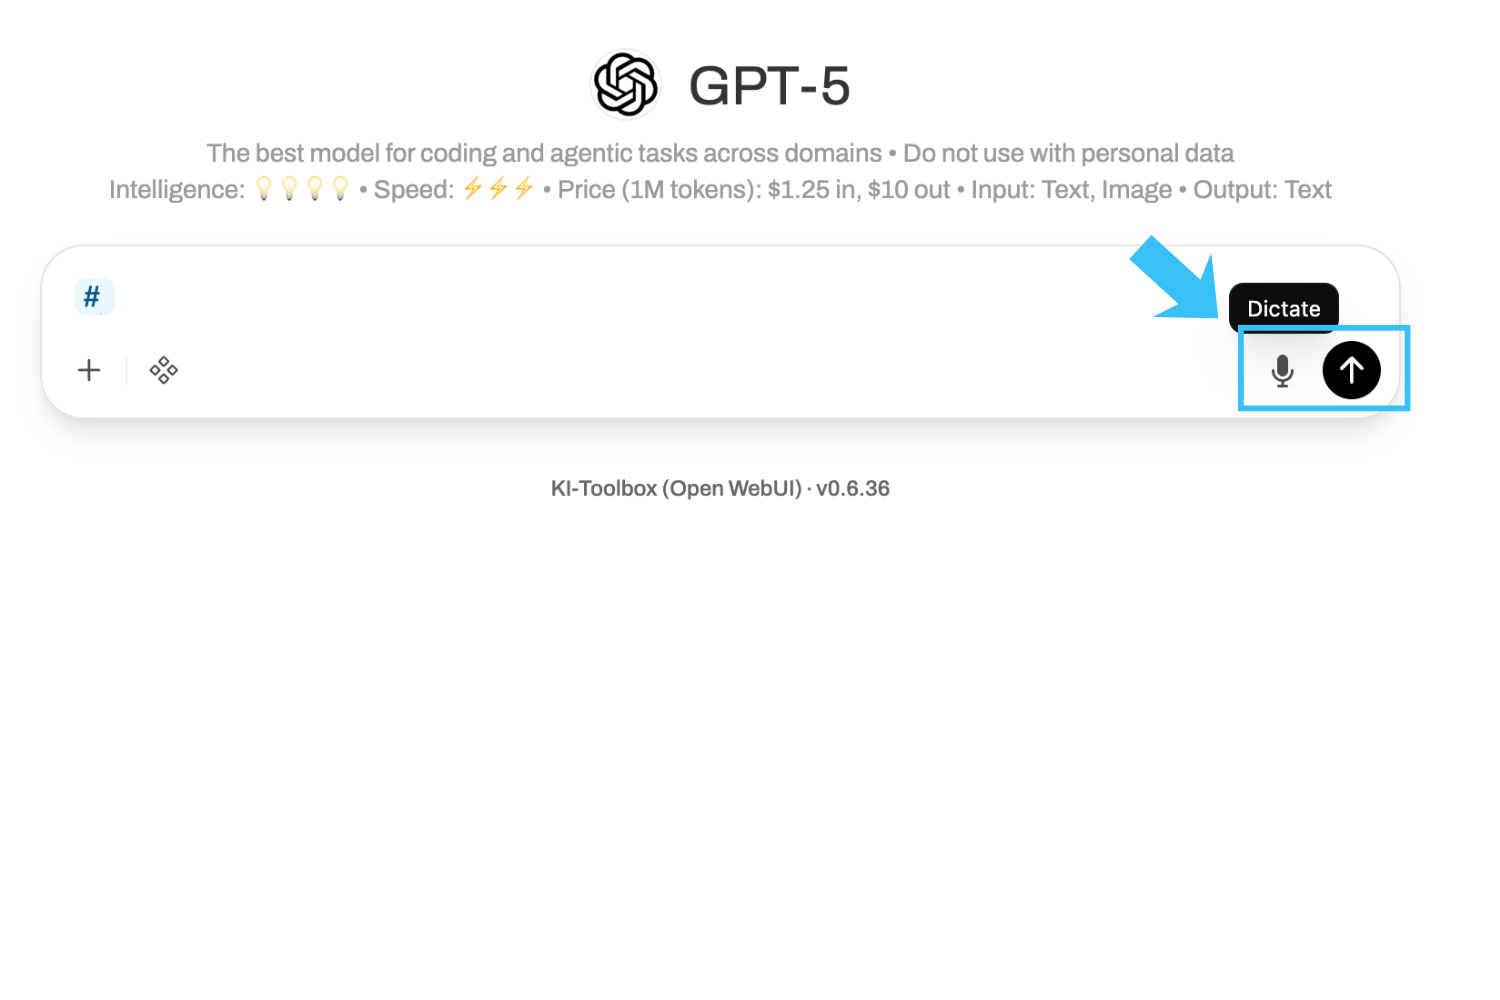
Dictate (microphone icon): Instead of typing entries, you can have them recorded and edit them again in writing before sending.
-
Voice mode (Soundwave icon): Here you can speak directly to the model and have the answers read out to you.
-
Read aloud: Regardless of which mode you have started a conversation in (text, dictation, speech mode), you can always activate and deactivate read aloud by clicking on the loudspeaker symbol under the AI output.
Create your own prompts
You can save frequently used prompts so that you can easily reuse them in your chats in the future.
To do this, navigate to"Workspace" >"Prompts" via the left-hand main menu
You can create new prompts using the"+ New prompt" button. Within the input mask for prompts, you can also use"Access" to select whether and with which group this prompt should be shared.

You can access the prompt stored in this way directly in the chat with a slash ("/").
%20(6).png)
Create your own knowledge base
It is worth creating a knowledge store if you want to use documents repeatedly in different chats as a knowledge base. You create a kind of private library that you can access as required.
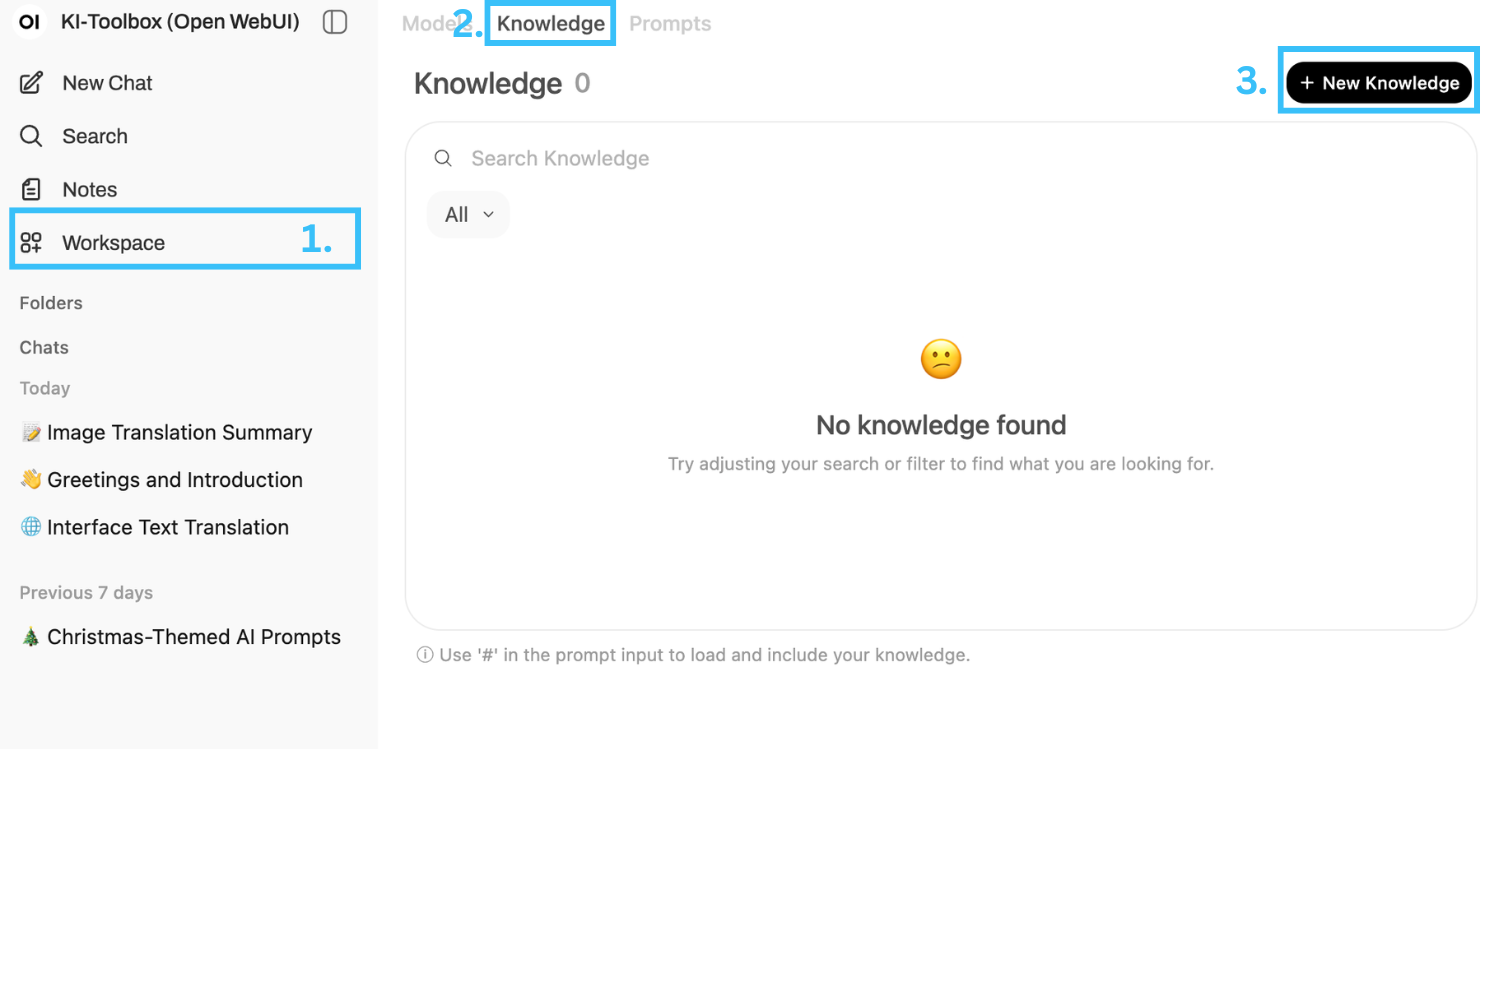
Navigate to"Workspace" >"Knowledge" via the left-hand main menu
Use the"+ New knowledge" button to create a new knowledge store, which you can fill with knowledge in the form of files or text in the next step. Enter the name and function of the knowledge store. Then click on"Create knowledge". You can now upload your documents using the plus symbol (+) on the right.

To edit an existing knowledge base, select it directly. You can then add entries within the knowledge store using the plus symbol and use "Access" to control who you want to share this store with.
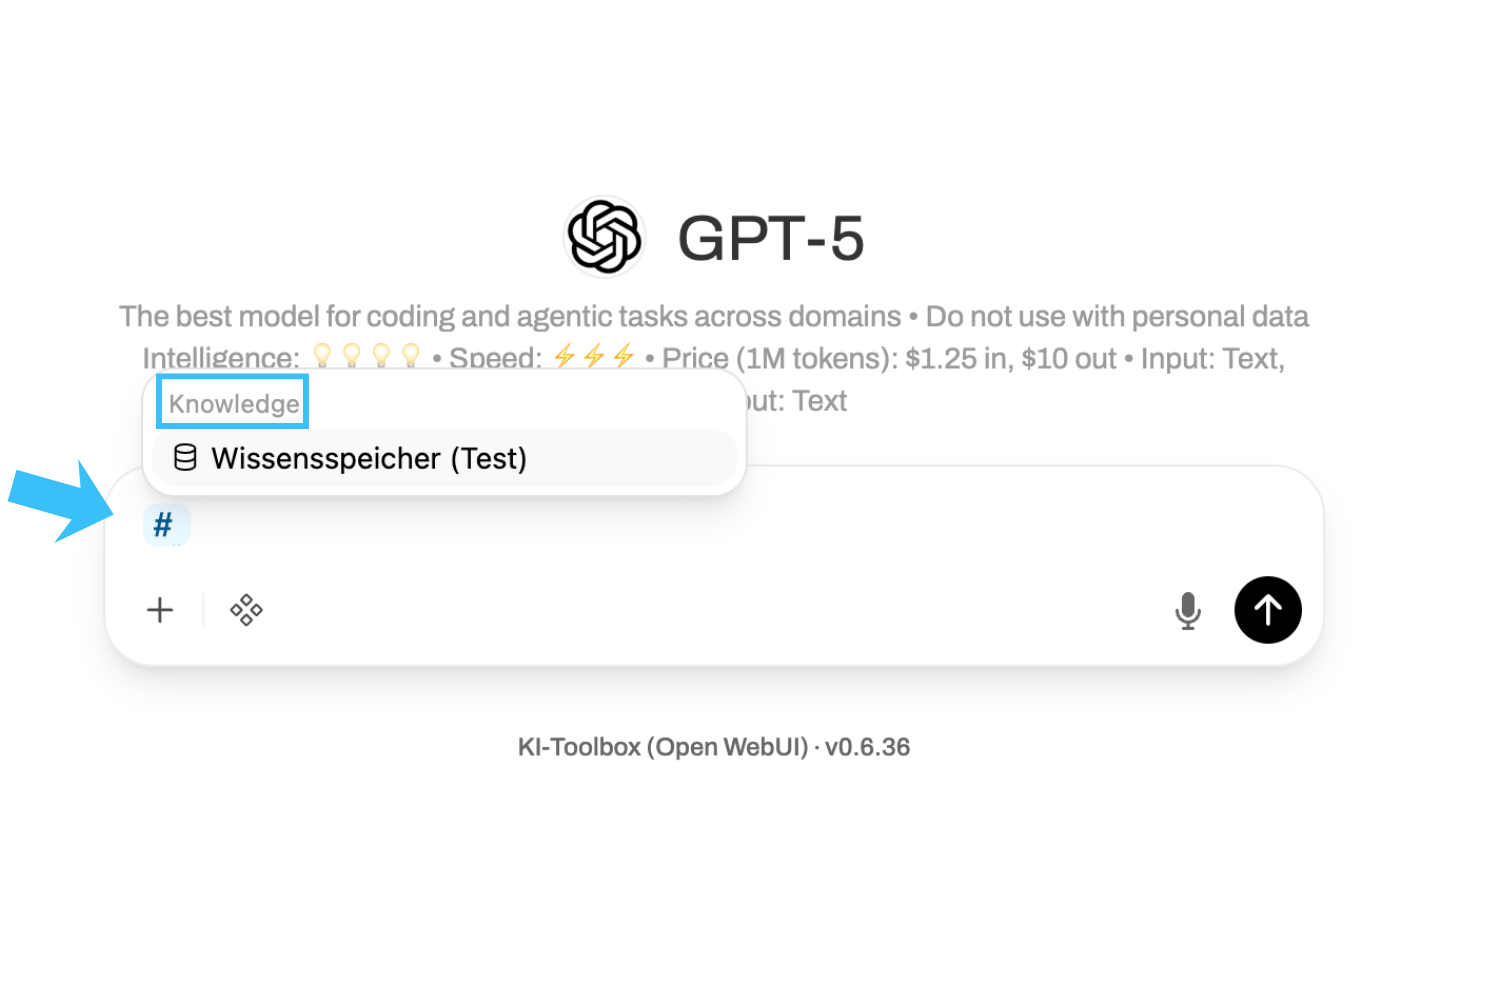
You can refer directly to the knowledge created in this way in chats with the hash "#" to retrieve the saved data. The AI can then access it when processing requests.

ⓘ PDF instructions for working with documents in the KI-Toolbox
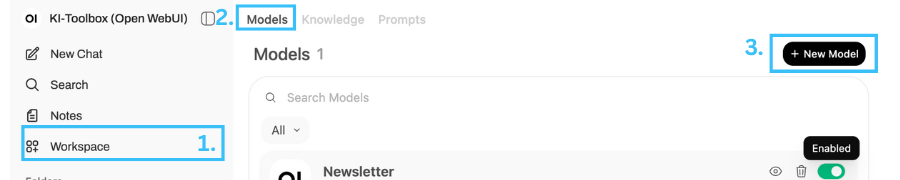
Create your own custom models (assistants)
AI chatbots are digital assistants that you work with in natural language: You can ask questions, write texts, structure information or prepare tasks. The assistants respond to your instructions, remember rules and can even work with your own documents. This allows you to complete routine tasks faster and achieve consistent results.
The following core components are required for a chat assistant: an assigned knowledge store and a system prompt.
How to create your own assistant: Navigate to "Workspace" > "Models" via the left-hand main menu. You can create a new model via the "+ New model" button.
You should configure the following points in the editing screen:
- Model name*: Mandatory information.
- Basic model*: One of the available language models must be selected.
- Description: It is recommended to set a meaningful description for all subsequent users.
- Visibility: In this section, you can control whether and for whom the model is shared: privately (only for you) or specific groups to which you belong.
- Model parameters: A system prompt will be very useful for most cases. Advanced parameters are optional (depending on the use case).
- Prompt suggestions: Are optional, but can help later users to better implement the use case.
- Knowledge: In many cases, a knowledge base will be essential for the use case. If no knowledge base is required, it may not be necessary to create a custom prompt, as the use of a (saved) prompt is already sufficient in such cases. It should also be noted that if custom prompts are shared, the associated knowledge must also be shared with the same group.
- Tools: Can be added optionally depending on the use case.
- Skills: Are only to be understood as "tags". The actual rights that a user has based on a custom model depend on the selected base model.